Hello again! This is the second part of my compute shader series. If you haven’t read the first part yet, you can find it here.
Now that we know how to create simple compute shaders, we will see how to parameterize them with uniforms.
No, not that kind of uniform!
What are shader uniforms?
Last time we added 2 arrays on the GPU. What if we wanted to add the first one to twice the second one? We would have to change the underlying WGSL code to do so.
For this simple example, you may think that it is not a big deal, we but won’t be doing simple examples in the next chapters.
We will be doing full terrain generation with multiple parameters (height of the terrain, how much mountains you want etc…).
The goal is to have one WGSL code that we can tweak using parameters, so you never have to change it in unreliable ways that could lead to errors.
Moreover, making a different WGSL code for each runs requires a new compilation of the shader, which is a costly operation. Using the same code with uniforms is much more efficient as we only compile it once.
This is where uniforms come in. Uniforms are variables that are passed to the shader from the CPU. We can change them for every compute shader execution, without having to recompile the shader.
Checkpoint 1
We will start from where we left off last time, if you didn’t save your playground’s url, you can use mine: https://playground.babylonjs.com/#JF2J4P#4
Don’t forget to select WebGPU instead of WebGL2 or WebGL in the top right of the playground.
Now let’s open the browser console by pressing F12 and then select the Console tab. You should see something like this:
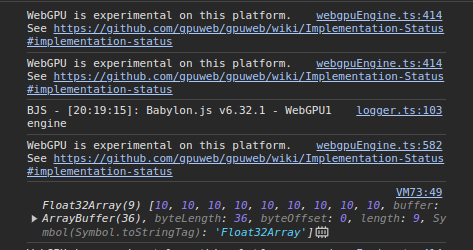
We see the result of the addition of the 2 arrays from last time, it is all good we can continue.
If nothing happened, check that your browser is compatible with WebGPU, more informations on that in the first part of this series.
Uniforms in WGSL
In WGSL, uniforms are grouped inside a struct. As WGSL expects explicit types, we have to declare first our type. We will be doing a weighted multiplication of our arrays, so we will need 2 floats:
struct Uniforms {
    weight1: f32,
    weight2: f32
};
The next thing to do is to add it as an input of our shader:
@group(0) @binding(3) var<uniform> uniforms: Uniforms;
You can see that contrary to our arrays which are storage buffers, the uniforms are declared as uniform buffers. This is because they are read-only for the shader execution.
In the main function, we can now use our uniforms:
resultArray[index] = uniforms.weight1 * firstArray[index] + uniforms.weight2 * secondArray[index];
That’s it for the WGSL part, now just like last time, we must take care of the CPU side of things. Don’t forget to save your progress!
Uniform buffers in BabylonJS
The first thing to do is to update the bindingsMapping of our compute shader to add the new uniform buffer:
uniforms: { group: 0, binding: 3 },
And now we have to actually bind data to it. Thankfully, BabylonJS has a nice API for that:
const uniformBuffer = new BABYLON.UniformBuffer(engine);
We only have to set our weight1 and weight2 values:
// declare the members of the uniform buffer
uniformBuffer.addUniform("weight1", 1);
uniformBuffer.addUniform("weight2", 1);

// update the values on the CPU
uniformBuffer.updateFloat("weight1", 2.0);
uniformBuffer.updateFloat("weight2", 3.0);

// send the data to the GPU
uniformBuffer.update();
In the first part, we declare the existence of the weight1 and weight2 variables inside the uniform buffer. The 1 passed as the second argument indicates the uniform only holds one value. weight1 and weight2 are of type f32 in our compute shader, and f32 is only one value, hence 1.
A vector of 3 floats is 3 elements, a matrix of 4x4 floats is 16 elements etc…
The second part is where we pass the actual data to the uniform buffer, we pass the name of the variable and the value we want to set it to.
The last part is where we actually update the buffer. This is where the data is sent to the GPU.
Finally, we have to bind this uniform buffer to the uniforms binding mapping:
computeShader.setUniformBuffer("uniforms", uniformBuffer);
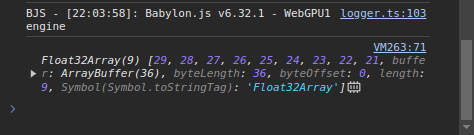
Now save your playground and run it! You should see something like this in the console:
Checkpoint 2
Congratulations for making it this far! You can check your code against mine here: https://playground.babylonjs.com/#JF2J4P#7
Making good use of our uniforms
Up until now, this was a lot of work for just something that we could have changed in the WGSL code. If I failed to convince you earlier, this should do the trick.
We will make a function that will run our compute shader multiple times with different parameters and return the result.
After the declaration of computeShader, let’s declare this function:
async function compute(firstArray, secondArray, weight1, weight2) {

}
Basically this compute method will allow us to reuse the same compute shaders with different parameters.
We will cut all the code after that function and paste it inside it. We also need to replace the hardcoded values of weight1 and weight2 with the parameters of the function:
async function compute(firstArray, secondArray, weight1, weight2) {
    // Storage buffers
    const bufferFirstArray = new BABYLON.StorageBuffer(engine, firstArray.byteLength);
    bufferFirstArray.update(firstArray);

    const bufferSecondArray = new BABYLON.StorageBuffer(engine, secondArray.byteLength);
    bufferSecondArray.update(secondArray);

    const bufferResultArray = new BABYLON.StorageBuffer(engine, Float32Array.BYTES_PER_ELEMENT * firstArray.length);

    computeShader.setStorageBuffer("firstArray", bufferFirstArray);
    computeShader.setStorageBuffer("secondArray", bufferSecondArray);
    computeShader.setStorageBuffer("resultArray", bufferResultArray);

    // Uniform buffer
    const uniformBuffer = new BABYLON.UniformBuffer(engine);

    // declare the members of the uniform buffer
    uniformBuffer.addUniform("weight1", 1);
    uniformBuffer.addUniform("weight2", 1);

    // update the values
    uniformBuffer.updateFloat("weight1", weight1);
    uniformBuffer.updateFloat("weight2", weight2);
    uniformBuffer.update();

    computeShader.setUniformBuffer("uniforms", uniformBuffer);

    computeShader.dispatchWhenReady(firstArray.length, 1, 1).then(() => {
        bufferResultArray.read().then((res) => {
            const result = new Float32Array(res.buffer);
            console.log(result);
        });
    });
}
And now, to prove you that uniforms are cool, we only need to call this function a bunch of times (like a thousand) with different parameters.
We will be making additions of bigger and bigger arrays with random weights to make it funnier:
// Initialize the arrays
const firstArray = []
const secondArray = []

// Iterate 1000 times
for(let i = 0; i < 1000; i++) {
    // Add one element to each array
    firstArray.push(i);
    secondArray.push(1000 - i);

    // Call the compute function with random weights
    compute(new Float32Array(firstArray), new Float32Array(secondArray), Math.random(), Math.random());
}
In your console, you will see A LOT of values:

And all of that with the same WGSL code!
Checkpoint 3
Once again, if needed you can check my playground: https://playground.babylonjs.com/#JF2J4P#8
Conclusion
That’s it for uniforms! I hope you enjoyed this tutorial, next time we will be doing procedural terrain generation with compute shaders: we will have something to display on the screen!